
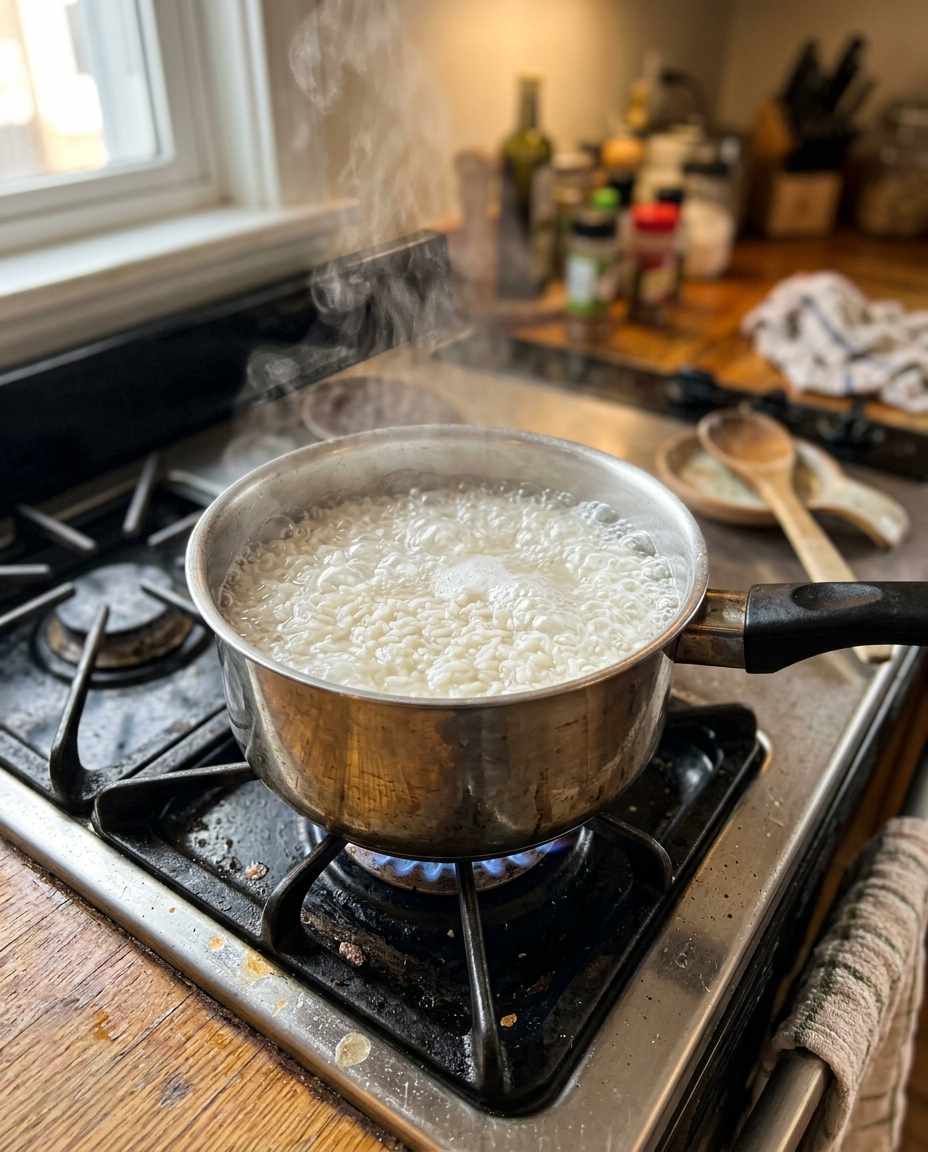
I remember staring intently at a bubbling pot on my stove, trying to divine the exact moment rice started boiling without rushing the process or letting it spill over.
Mastering this moment transformed my cooking, yielding fluffy grains rather than soggy mush.
This guide unpacks everything you need to know about rice’s boiling point and how to harness it perfectly.
Understanding Boiling: Water Temperature and Rice
Boiling, technically, is when water reaches 100°C (212°F) at sea level, producing vigorous bubbles.
When cooking rice submerged in water, the boiling point triggers energy transfer that gelatinizes starches, making rice edible and fluffy.
However, water’s boiling point changes with altitude and impurities, shifting when bubbling visibly starts.
For example, cooking rice at 5,000 feet above sea level reduces the boiling point to about 95°C (203°F), meaning your pot will bubble sooner but cook rice differently.
High-altitude cooks often struggle because the lower temperature lengthens cooking time, complicating timing for the perfect grain texture.
A common mistake is assuming bubbling always means boiling at exactly 100°C.
In reality, you might see smaller bubbles or gentle simmering before true boiling, which won’t cook the rice properly.
This misunderstanding leads to premature lid removal or erratic heat adjustment.
You’ll want to measure water using a kitchen thermometer for precision or observe the pot’s behavior: large rolling bubbles and a steady steam cloud confirm true boiling onset.
Adjust heat incrementally after this point to maintain a gentle boil without overspill or burning.
Choosing the Right Pot: Material, Shape, and Size

Pot material deeply influences how quickly water comes to a boil and stays there.
Thin aluminum pots heat water rapidly but lose heat fast, causing uneven boiling.
Conversely, heavy-gauge stainless steel pots with an encapsulated aluminum base distribute heat evenly and retain temperature better, giving you control during rice cooking.
Shape dictates heat distribution and evaporation rate.
A wider pot, say 8–10 inches in diameter but no deeper than 4 inches, encourages faster boiling through greater surface area but risks water evaporation too quickly, potentially drying rice.
Taller pots conserve moisture but slow boil onset.
Size relative to the rice-to-water ratio is crucial.
Overfilling a small 2-quart pot with 2 cups of rice and 4 cups of water increases boil-over risk and unpredictable cooking.
I once struggled with a small non-stick pot that overflowed midway—switching to a heavier 3-quart pot with a tight-fitting lid solved this.
Choose a pot with a heavy lid that seals well to trap steam and heat, preferably with a vent hole to prevent sudden pressure build-up and messy boil-overs.
Avoid glass lids that fog entirely; stainless steel lids offer you moderate steam release and consistent temperature maintenance.
Water-to-Rice Ratio’s Role in Timing Boil
The classic ratio of 2:1 water to rice by volume ensures enough water for fully hydrated grains but also influences the boil dynamics.
Excess water delays boil onset due to higher volume and acts as a buffer against temperature fluctuations.
Conversely, insufficient water leads to premature drying or rice scorching before cooking completes.
I experimented cooking basmati rice at ratios from 1.5:1 up to 2.5:1.
At 2.5:1, the water took noticeably longer to reach a rolling boil, but rice yielded fluffier grains.
The trade-off is longer cook time and higher fuel cost, relevant for outdoor or energy-conscious cooking.
Misjudging this ratio is common—some recipes call for less water aiming for firmer rice, but beginners often mistake the lack of bubbling as undercooking and increase heat, causing boil-over.
Understanding this ratio helps you know when to expect boil onset and adjust heat accordingly.
Always measure rice and water with graduated cups and account for grain type differences—long-grain varieties absorb water more slowly and need proportional adjustments.
Matching your boil timing and water volume is key to consistency.
Heat Source and Flame Control for Perfect Boil

The type of heating source—gas, induction, electric coil—affects how fast water reaches and maintains a boil.
Gas offers immediate, visual heat control; induction provides precise temperature stability and quick adjustment; electric coils often have lag time, leading to overshooting.
In my kitchen tests, induction stoves consistently brought water to a rolling boil in under 4 minutes with minimal overshoot, allowing me to reduce power immediately after boil onset.
On gas, I found subtle observation of flame size crucial to prevent rapid boil-over while keeping heat strong enough.
A typical misstep is cranking heat to max too early, causing violent boiling and foaming, leading to messy spillages.
This also wastes energy and can break rice grains by agitation.
Slower, steady heating after initial boil onset preserves grain integrity.
For best results, start on high heat to get close to boil quickly, then reduce flame or power to medium-low to maintain gentle simmer.
Many modern induction stoves feature temperature presets—set to 208°F/98°C for near-boiling simmer for rice.
The key is watching the pot rather than relying solely on stove dials.
Visual and Sensory Cues of Boiling Rice
Rice boiling looks different at every stage; recognizing these cues is essential for timing heat changes and lid handling.
Initially, tiny bubbles form along the pot’s edge; these are not full boil but indicators of heating.
True boiling features large, vigorous bubbles breaking the surface rapidly across the entire pot bottom.
Steam volume also shifts—a faint wispy steam indicates near boiling; steady dense steam confirms active boiling.
When you see rice grains jiggle slightly in the pot, starch gelatinization has begun, and your water temperature is sufficient to cook the grains evenly.
Beginners often panic at the first bubbles and open lids prematurely, disrupting even cooking steam balance.
Conversely, silently simmering too long without bubbling means unsteady heat, increasing cooking time and causing uneven results.
Pay attention to sound too: a steady, rolling boil emits a consistent bubbling noise, compared to intermittent splashing when simmering.
Learning these multi-sensory signs allows perfect timing for lid adjustment and heat reduction.
Preventing Boil-Over: Tips and Techniques

Boil-over happens when starch released from rice traps bubbles causing foamy water to spill rapidly.
This frustrating mess contaminates burner surfaces and can extinguish flames in gas stoves.
The mechanism involves bubbles trapped by viscous starch layers, growing until the pot overflows.
An effective technique is pre-rinsing rice thoroughly to remove surface starch, dramatically reducing foam formation.
I recommend rinsing several times until the water runs clear, especially when cooking short-grain varieties high in amylopectin.
Another insider tip is adding a small amount of oil (5 ml per cup of uncooked rice) to the water or placing a wooden spoon across the pot top, which disperses bubbles and breaks their surface tension to prevent foaming over.
When you observe boiling starting, reduce heat immediately to a gentle simmer to maintain bubbles without creating excessive foam.
Keeping a close eye prevents surprises and allows ideal temperature control without sacrificing cooking speed or rice texture.
Lid Choice and Steam Management
The lid you use greatly influences boiling dynamics.
A heavy, tight-fitting metal lid traps steam and raises internal pressure slightly, effectively increasing water temperature inside and speeding gelatinization of rice starches.
Glass lids create condensation that drips back, but heavy steam fogging obscures visual cues.
Some lids feature vent holes or silicone seals designed to release excess steam, balancing pressure and avoiding rapid boil-overs.
I prefer lids with adjustable vents for rice cooking, giving me control to let off small amounts of steam while preserving internal heat.
A common misstep is using a lid that seals too tightly without venting, creating an almost pressure-cooker environment that risks water boiling dry or foaming intensely.
Conversely, allowing too much steam to escape by not covering or partially covering increases cooking time unpredictably.
I recommend selecting a stainless steel lid with 1–2 mm vent holes or ones with adjustable venting rings.
Start with the lid snug and vent closed until boil onset, then slightly open vents to prevent pressure spikes and maintain a gentle but steady boil.
Altitude and Environmental Factors Impact Boiling
Altitude affects not only temperature at which water boils but also cooking speed and grain texture.
At higher elevations, lower atmospheric pressure causes water to boil below 100°C.
This means your rice will boil sooner, but it will take longer to cook properly because of reduced heat energy.
I once cooked in Denver, Colorado (over 5,000 feet elevation) and noticed my usual stovetop timing for rice failed; the bubbling began earlier but rice remained hard after the typical 15 minutes.
Adjusting cooking time and water ratios upwards fixed texture but took experience.
Humidity and kitchen ventilation also play roles.
Higher humidity slows evaporation, promoting more stable boiling and steam retention.
Conversely, dry open kitchens accelerate water loss; I’ve had to add small amounts of water mid-cook to keep rice moist.
To combat altitude effects, use a digital thermometer to monitor actual water temperature at boil, increase water volume by 10–15%, cover with tightly sealed lids, and extend cooking time by 10–25%, testing grains near the end to avoid undercooking.


Leave a Reply